Friday, January 31, 2014

Goodbye Black Walls

It was cutting edge and daring at the time.
We were so chic and totally out there for painting walls black.


 Only teenage Goth children had black walls.


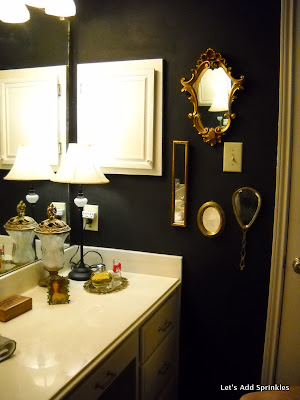
Rebekah and I loved these walls but it's time for a change.


They've got to go.
I used to love, love dark, moody wall colors.


Not anymore. 

  
 I think I'm going to go with white. 
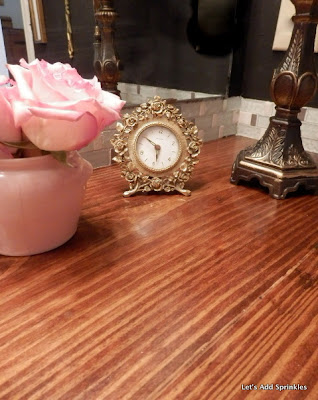
I think the white vanity and wood counter top will look good against a bright backdrop.


I also want to frame out this mirror and put up some wainscot since I know how to do that now. 
  I would have done this room already but our house has been a revolving door of our adult children needing to stay with us.


I want them to feel that this is their home even if we have stuff everywhere and we are tripping over each other. 
My oldest is about to embark on a major change.
He will be leaving for N.Y. soon.
My Texan son, born and raised will go live in the state where I was born and raised.
My brother just moved his middle child to New York, as well.
Crazy. 
I'll keep you posted on the bathroom and on my son. 
Have a great day. 
Katie


Thursday, January 30, 2014

Water Marks on Fabric

There was a stain on our new sofa.
It looked like a little spill of some kind and it was only about the size of a quarter.


It was bugging me so I got a wet rag and started working on it. 
Big mistake!
The spot that was about the size of a quarter left a water ring about the size of a grapefruit.
So I Googled what to do. I was pretty skeptical that anything would work.
  The search said to dampen the stain.
At this point I risked my grapefruit size stain turning into a pumpkin size stain.


But I followed the intructions and wet the area around the water ring.
I covered the wet area with a white cotton cloth and ran the iron over the stain with it set on low.
I used a pillow case. 


It took a while for the iron to dry the water but it did. 
When I lifted the cloth the water marks were gone. 
I still have a faint outline of the original stain but it looks so much better with out the huge water mark. 


I'm a little disappointed that this fabric isn't a little more wash and wear. It looks like it should be.


I was afraid that it wouldn't work and I would have an even bigger water ring and that the iron would melt the fiber in the cushion of the couch. 
Neither of these happened and the Google search proved a success.


I am sort of a cushion hoarder. 
(I'm a pillow hoarder too, but that is another post.)
;)
I never want something on one side of the cushions so I can't flip them. Does this make sense to you? 
I have two perfectly good sides to the cushions and I want it to stay that way.


We scrimped and saved to buy our first couch; a country blue camel back number. 
It was divine until the baby sitter left my toddler alone in the living room with the chocolate ice cream so she could talk on the phone with her boyfriend. 
Oh my word! It was a disaster!
Chocolate was smeared from one end of the cushion to the other. That couch got water rings too, if I recall. 


The crisis is averted with this couch and I still have two perfectly good sides for flipping freedom. 
Have a blessed day. 
Katie

Monday, January 27, 2014

Friends In Low Places

I was so frustrated with our lower cabinets.


There was a flaw in the roll out shelf system and a few years after we bought the house, the supports started to break. 
One by one they broke and one by one I wired them back together.


It was not a perfect solution by any means but I didn't know what else to do.
The wheels have recently begun to stick so there is drag and squeaking every time I try to get something out. 
One of the most frustrating areas was the cabinet with the pots and pans. 
No matter how I tried to stack them, nest them, with lids, without lids, it was always a jumble.
It was dark in there.
I could never see what was in the back corner. 


This cabinet was not my friend. 
The other family members who help with dishwasher unloading were also frustrated with our situation.
I picked up a little shelf like thing while I was out one day and utilized it in my platter cabinet. 
I loved it so much that I thought the same type of thing could work for the pots and pans.
I realized there was freedom in getting rid of the pull out shelves. 
I bravely took them out, unscrewed the supports and put them in the trash pile. 
We are never, ever going back to that system.
I had no intention of getting out today so I started looking around the house for a solution to this cabinet's organization. 


I saw a shoe rack that I used for lunch boxes and drinks in the pantry. 
Perfect. 
It is white like the outside of the cabinets so it will brighten up the inside and it will provide two levels of storage.
The pots fit perfectly on the shelves.


 I am thrilled.
So is my son. 
He said, "It's about time."


Almost all of the same things are back in the cabinet as in the before picture. 
The only thing I got rid of were stray storage container lids.
 Amazing!
 I love how organized it all is.


It's so much brighter in there.


I'm so glad this cabinet and I are finally friends. 
Next up? The mixing bowls and bakeware…
Katie   

Linking with,
City Farmhouse   
A Bowl Full of Lemons

Sunday, January 26, 2014

Winter Preschool Art

We've had a busy month at school.
We reused our Owl bulletin board and put cotton ball "snow" and snowflakes on it.
The kids made the snowflakes the first day back from Christmas break. 
It was an easy and low key way to ease back into a busy day. 


In the spring we will have the kids make some cherry blossoms. 


We had the kids build these cute snowmen. 
It reinforces small, medium, large, on top of, and shapes.
We did have to remind them to have their circles touching but that was about it. 
Didn't they do a great job?
Older children could cut out their own circles but we did all the cutting. 


We also did an Arctic/Antarctic animal study and made these penguins. 


I love how each one has their own personality. 
I'm not high maintenance about where they put stuff. As long as it looks like what it is supposed to be we allow them to do it themselves. That's what makes it cute to me. Otherwise than the teacher is making all the art. 
That is a no-no in my book.

We hung them next to the blizzard they made with stamps and white paint. 

Two years ago one of the kids busted out singing when we made these; "We're going to a penguin party." 
Soon they were all singing it. It was adorable.
His penguin actually looked like it was dancing. 
  
We got the idea for these snow globes off of Pinterest.


We are ending the month with our Texas and Cowboy/Cowgirl units.
We made these state shaped flags last week.


We take the opportunity during Art/Craft time to reinforce fine motor skills. 
We also review concepts learned one on one or in smaller groups. 

Our walls are full for the time being.
Soon we'll take all this down and start Valentine's Day stuff.
Thanks for coming by.
Katie  

Thursday, January 23, 2014

IKEA Stuff


My neighbor wanted to go to IKEA. She asked Rebekah and I to come along to help with any heavy lifting.
I always feel so overwhelmed at IKEA so this time I perused the website before we left.
It worked because I found almost everything on my list and only two things that weren't.


This cute, cute terrarium was on my list. 
I styled it in Pottery Barn style with books, a bird and some of IKEA's lacy pots.


It was only $20.00. The sides are plexiglass and a little shiny but I still think it is adorable. 


I knew I wanted one but I wasn't sure where I would put it until I was looking at the website across from the t.v. cabinet and decided it would look great on the media cabinet. 


This little bird came from an antique mall in Fort Worth. 
It is one of my favorites.


I also got a few more SAKRER plant pots and some matching candle holders.
I love them on the mantel.


Just a few IKEA changes. 
Katie 

Linking with,
French Country Cottage 
 Common Ground


Monday, January 20, 2014

Cottage Bathroom


I am so thankful that I have projects and blogging to keep me entertained during these weeks when Bill is out of town.


 There is only so much T.V. I want to watch!
  
I'm off on Mondays, so I headed to Lowes looking to spend a $25.00 gift card.
I couldn't find what I had in mind but instead saw some bead board paneling.


We used this product in the master bathroom and I thought it would look good in the powder room too. 
I'd been itching to do this for a while plus I'd just read this post by Donna over at Funky Junk Interiors so I was feeling very brave. 
It took three nights to complete. 
Instead of the gigantic sheets of plywood paneling, I got the  packages containing 12 sections of bead board covering 3.5 linear feet.
These are a very manageable size to deal with and they  
were $10.50 each. With tax, my out of pocket was only $9.00. 
The wall behind the potty and the wall with the vanity proved to be the challenges so I did the easy wall first. :)


Bill hasn't shown me how to set up the air compressor and the nail gun so I pulled out the old school tack hammer, brads and nail set.


This only took a few hours even with the tricky cut by the vanity. I had to do that twice. 
My first idea was to make a paper template and trace it onto the wood. Nope! I just decided to measure down and in to get the edge of the cabinet just right. 
It is not perfect but chalk will fix it. 


 I had several flawed pieces that I was able use behind the toilet. 
I wasn't happy about how many pieces had little dings or splits.

The next day when I got home from work, I painted the upper walls.


I mixed a little gray paint with some Glidden white to create a soft gray that leans a little blue/green. It's very pretty and a complete change from the gold that was in here.


I had to ponder the trim over night. 
I cut shims to put above the top of the paneling so the trim could overlap the top of the paneling below. Otherwise I could see the rough edge of the paneling slats.
I primed and then painted the bead board White Duck by Sherwin Williams. 


I put all the same accessories back in the room.
I would love a different mirror but the golds of the mirror frame go with the warm tones of the vanity top.


Bill says I can get the shower retiled but I think I'm going to wait on that for a while. I really have no desire to tear apart another bathroom so soon after doing the master bath last summer.
I love it and I'm ready to try this somewhere else in the house!