Thursday, June 28, 2012

Repurposed Item From The Past

He knew this would happen.
He told me it would, but I didn’t believe him.
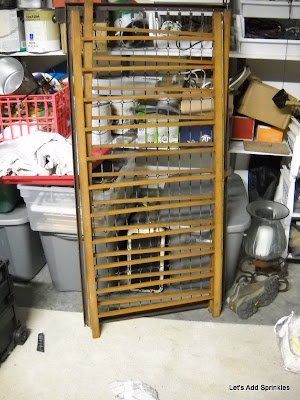
The cribs that we have stored in the attic for 21 years should not be used. Millions of cribs made before 2007 have been recalled.
I would not feel good about having my grandchildren (grandchildren that I hope to have someday) in cribs that were a potential hazard.
When I was looking up the measurement for a full size head board it dawned on me that the side of a crib might be the same width as a full mattress. When I went in the attic to look at the two I had up there, I realized that the side rails on our cribs were pretty nondescript, that the most interesting parts of the bed were the head and foot.
For some reason we didn’t only have the crib that my children slept in but also the crib that my husband and his siblings slept in.


That one was more interesting and it fit the colors in the room.


I knew there was no way that a baby would ever sleep in that bed again. 
I put the head rail and foot rail together attached to the wall.


You have read about the bedding. Here. 
I love the new chandelier. Here.
This room has come together so well.
I can't wait for guests. It will also get used when one of us has trouble sleeping and is afraid to wake up the other.
I have plans to use all the other parts as well.
Maybe Bill can even make something out of the bed my children used.

Redo of the Deck Cushions

The mornings around here have been beautiful. I have been hanging out on the deck since I cleaned it up, made some new pillows and freshened up the accessories. If you have been one of my readers for a while you know how bitterly I have complained about our summer last year. 72 days over 100 degrees. The heat and sun reaped havoc on my outdoor cushions. I know, I know I should have pulled them out of the sun, but it was even too hot to do that. 


I came home from work one day last year and found that my hot mess of a dog sensed a weakness (in the force) and went nuts tearing up one of the cushions.
She also has an affinity for pillows.


Ai, yi, yi!
 I was able to remove the shredded cushion and turn the rest over and hide the damage for the time. 
But I have been wanting to recover them for a while. 
I went around town looking for drip dry outdoor fabric. 
I am not one that likes my upholstered pieces in anything but a neutral, so I can jazz things up with pillows and such. 
 The cost of outdoor fabric was a shocker.
 Outdoor fabric at Joann's was $24.99 a yard.
I need about 8 yards. I would be willing to do that for a fabric that I loved but I didn't see a thing. We only paid about $299.00 for the whole set three years ago. It would be very difficult to spend almost that much to refurbish this set. 
I shopped around for new cushions but they were not really 
what I needed either.
So.... I turned to my "go-to"fabric. 
Drop Cloths!!
Bill got me a gift card to Lowes for Mother's Day :)
 I only paid a dollar out of pocket to stock up on all the drop cloths I needed.


This is the brand I like:
I have used them for table cloths and pillows.
Read about a chair I slipcovered here.
 Bill bought one to lay down in the car for our dog.
They get softer with each use and washing. 
Here is my big secret for making cushions.


After sewing three sides and turning it right side out, I hot glue the fourth side closed.
It is time consuming to hand sew the openings closed and it is very hard to get the sewing machine close enough to the edge once the pillows or cushions are stuffed.
I change pillows around quite frequently because I love pillows so much!
It makes for a quick change when I tire of pillow covers.

This only took about 41/2 hours. I was having trouble with the tension on my sewing machine.


I really need a new sewing machine. Mine is about 21 years old and has issues.
The canvas is not water proof. I got the 8 ounce instead of the 10 hoping that if these get wet they won't take too long to dry in the 
hot, (very hot) Texas sun. 


Dixie Lou wouldn't get out of the picture. Picture taking is very time consuming. I was just too lazy to move her. 

.

 I found the cute lantern while rummaging through the shed. It has been around a while and had faded to pink. I taped off the glass and hit it with Rustoleum red spray paint


Loving the fire engine. It's a trash pick from the neighbor.


See the little ferry? I picked it up a few years ago at a antique shop. 


 Each of my kids has a quilt I made them. This is Chris'. His was the most intricate because he is the first born, not because I love him more. I just had more time!!. The other ones got easier quilts. 
The sailboats squares on this thing were a beast!
Put it is such a cute pattern.


We have a fairly long hot and dry season. 
I don't think this would work in a wet climate. 


Before: 
After:

This furniture is so comfy now!!
The love seat stays shaded until about noon. 
I will let you know how hot it gets out there.


Let's just hope that little miss doesn't decide to chew up more cushions.

Tuesday, June 26, 2012

Neiman Marcus Bars

Neiman Marcus Bars
Gooey Butter Cake
or
Chess Bars
I think they are all about the same thing.
We always called them Neiman Marcus Bars. 
I lost the recipe someone had given me so I searched through all my old school fundraiser cookbooks.


Don't you think that these are the best?
I looked in this one from my mother-in-law for the recipe. 
Don't ask me what A.E.S.P.A stands for.

I saw one and knew it was the same recipe I called Neiman Marcus Bars.

Chess Bars
1 box yellow cake mix (I use Duncan Hines)
1 stick butter
1 egg
Mix together dry cake mix, melted butter and egg. Blend well and pat into a greased 13x9 pan.
Batter will be pretty firm.


Mix together:

 8oz cream cheese softened.
16 oz. Confectioners sugar
and
2 eggs. (I know that some of you observant readers will notice 4 eggs. I doubled the recipe for a shower:)

Pour over crust.


Bake for 42 minutes @ 350 degrees.
I put an air bake cookie sheet under the  pan for the last half of baking time so the bars don't get too done on the bottom.


Sift 1/4 cup confectioners sugar over the top of the bars.
Trim the edges and cut into squares.
These are rich and wonderful.

I found a wide variety of recipes on the internet. Each with small changes. 
I have had these at potlucks sometimes and thought 
they were too dry.
This recipe seems perfect.
And it doubled well!

Some of the recipes on the internet for so-called Neiman Marcus bars had either coconut or nuts.
That has never been my experience at any potluck.

As well,
The original Gooey Butter Cake seems to be from St. Louis.
It was rumored to be an accident in the 1930's and was actually a breakfast cake or bread as the cake layer is made with yeast and needs to rise for a bit.

The original gooey mixture was corn syrup, an egg, sugar, vanilla and flour. Quite different from the cream cheese version popular now.

I think the cake mix concoction seems much easier. 
As soon as recipe mentions yeast and rising- I'm out. :)

I hope you will try this wonderful bar. It is always a hit at family functions.


Supposedly Bobby Dean has a lighter version. I have it pinned on my food board on Pinterest and will give that one a try sometime. 
Katie
Linking with,

Metamorphosis Monday @ Between Naps on the Porch
Wow Us Wednesday @ Savvy Southern Style 
Time Travel Thursday @ The Brambleberry Cottage
Feathered Nest Friday @ French Country Cottage 
Sat Nite Special @ Funky Junk Interiors
Sunday's Best Par tay @ 1929 Charmer Blog


Sunday, June 24, 2012

Master Bath Mini Makeover Complete

The transformation of our bathroom has been an on and off again endeavor for years!
I would update something and sit and stare at it for months until coming up with something else to do.
A few coats of  Stamped Concrete by Sherwin Williams freshened things up.
But I didn't care for the chandelier and the curtains with the new paint color. 

I remade some curtain panels from Walmart to coordinate with the new walls. 

Much better.
I deblinged the shower here.

We took down the huge builder mirror and put up two matching mirrors from Kirklands.


Mr. Bill made a new false front for the tub.
I painted the vanities.

This was so much better but something was still wrong.


I made new white valances for a crisper and cleaner look.

These faucets tormented me with their blinginess.

I tried stripping the lacquer off the faucets so they could begin to tarnish.
Lifetime warranty American Standard faucets are impenetrable to any solvent.
It only made them shinier.
I gave up and finally took the plunge with my favorite Oil Rubbed Bronze Rustoleum Metallic.
I taped everything.
Some bloggers have taken the faucet off, I was afraid that if I took them off they would never go back on these sinks. That is why I didn't get new faucets. Walmart had some cute nickle ones for only $39.00.
But last time we had a sink issue we couldn't get the drain to go back on correctly. I know that these sinks will have to go in a few years and I didn't want to invest in a faucet with an eight inch spread when I will want the other kind if we have a stone counter.
I used a lot of plastic everywhere to catch the 
overspray.


I used ugly Christmas wrap to cover the counter.
Paint in a well ventilated area.
Use a mask.

Spray the paint from every angle that you can think off and then some.

I took off the paper and wasn't wowed like I was downstairs.


I was completely in love with the powder room.
The powder bath has such a warm tone with Kilim Beige from Sherwin Williams.
   
It took me a little while to get used the dark faucet with the cooler toned walls upstairs.
The room needed more so I sprayed the light fixtures.

I had to go back and hit them with a tiny bit of gold.

I used Ebony Buff and Rub on my little picture frames and mirrors.

I love it!


I didn't do the drain spouts. They were already nickle for some reason they never matched the old faucet and I wasn't sure how the paint would hold up on them.


The Wedgwood vase and napkin ring got pulled from the guest room. The jar is Avon that I found at a garage sale for 25 cents. It got a run through the dishwasher. Lotion looks so much prettier in it than it the container it came with.


The faucet downstairs was done three months ago and the finish has held up fine.


It finally feels restful and finished!! 
A stack of fluffy white Tommy Hilfiger towels from Big Lots and we are good!
I realize that the rest of my metals in this room are brushed nickle but we are okay with mixing the two for the time being. 
This little bird sort of typifies the space, 
dark, wonderfully tarnished silver.


 I am completely smitten.
Cost for this part of the makeover?
$6.98 for the spray paint. 
Have a great day.