Wednesday, October 30, 2013

Happy Halloween


I can't believe tomorrow is Halloween. Is it me or did the month fly by?


Rebekah is coming over to do her laundry and help pass out candy. 
Dixie barks like crazy every time the doorbell rings and it will take two of us to corral her.
I thought I would show a few pictures that didn't make it into a post.
I had great intentions to write some more Halloween/fall  posts but I just ran out of time.


 Welcome!


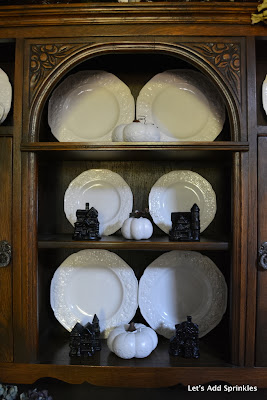
I sprayed the pumpkins and the cottages to create this display. 
On the top, I put some garden edging and a scarecrow. 


You saw the mantel in this post
 I think I am going to love the little dresser for vignettes in the living room.


 The sunroom got a few decorations.


The sunroom is fall rather than Halloween but by Friday I will change it a little. The orange will all be put away. 
I will be pulling more browns and deep dusty lavender hues. 


Here is the front yard.


The porch swing is on the side of the driveway.


I did a little to the back deck but shortly after I took these pics it started raining again. 
I am so thankful for the rain but I had to put all this away. 


Bill and I found the white patio table on clearance at Home Depot. It was only $37.00. 
I had the two little chairs already. 
I tried to find a couple more chairs but no one had anything.
 I don't know why, we can finally go outside again without sweltering. 
Gotta love Texas!  


A friend and I did some cute crafty projects with drop cloths tonight. I will show off our creations in the coming weeks. 
I am actually going to try to focus on Thanksgiving and not rush Christmas even though it is super tempting. 
Have fun tomorrow. 
Katie

Sunday, October 27, 2013

Banister Update or No More Orange

I have been very unhappy with the color of my banister.
To be perfectly honest, I have never liked the banister itself
but we have never wanted to spend the money to get something else.
This was the last of the orange colored oak in the house and it was taunting me. 

I painted the mantel.
We painted the kitchen cabinets white.
I replaced or painted the bathroom vanities.  
I have wanted to do something with this banister for a few years. 
I've thought about changing the newel post and I may still do that. At the very least, I thought I would paint the whole thing last summer. I pinned some wonderful inspiration. 
As I looked at it though, I felt that white wouldn't ground the space enough. 


After the big bathroom remodel, I just didn't have it in me. Painting all the trim, molding and doors in the bathroom was enough oil based paint for a while and I knew all the balusters on this would not be easy. 
I decided to go the easiest route. 
Stain. 
 In fact I was going to try out gel stain. I had heard and read many times on the blogs that it would cover better than regular stain. 
Ummm, no.
They had no dark colors of gel stain available at Home Depot and the sales guy talked me out of using it. 
He said it was no different than regular stain just thicker. 
Instead I opted to go for two tones of regular stain. 
I roughed up the banister with a little sand paper and then smeared a coat of Jacobean and a coat of Ebony over the whole thing.


A couple of places needed a third coat.  
I love Jacobean by Minwax.


 It's my favorite dark stain before getting to a black. 
I wanted to stain this thing rather than paint for two reasons.


It is much easier to stain something than paint it.
I also wanted to draw the color of the front door toward the stairs. 


By staining the stairs the same color as the door it will draw the eye in.
It isn't as dark as I wanted to be, but I am  pretty happy with it. 


Before:


 After:

I re-read a post from Holly at the Down to Earth Style Blog.
She hit her orange wood with black paint first. I wish I had done that to get those underlying orange tones eradicated. I did that to my kitchen cabinets a few years before we painted them. I really thought ebony stain would do the same thing but it isn't as dark as the black paint would have been. Oh well. I will probably do more to it later but for now it isn't taunting me anymore. :)
It took about three weeks for it to dry completely so I think the rest of the family would like for me to just leave it alone for a while! 

Update: I ended up painting the banister anyway. 
See it here: 
I love it so much more now.  

Katie   
Linking with,
Between Naps on the Porch   
Savvy Southern Style

Friday, October 25, 2013

Preschool Stuff

I have a bit of a double life.

I haven't really talked much about my real job.
I am a preschool teacher and director of a little program for 1-3 year old students.


I thought I would show you a few things my darlings have been up to the last few weeks. We have been busy!   


My co-worker Sara and I have had a great a time creating bulletin boards with our little one's artistic creations.


Our classroom and hall look very festive.
Can you be too festive?


Sara and I teach together in a class every Tuesday and Thursday. We have the thrilling Threes!


Some of our craft ideas have come from Pinterest or Mailbox Magazine. 
Some we have been making for years but they are still fun.


October is one of my favorite months at school.


We made the scarecrow craft but we also built a scarecrow out of old clothes. 


We saw the cat on Pinterest last year.
 We adapted it to create the dog. 


 I love my job. Thanks for letting me share. 
Maybe you need a craft idea for Sunday School or for the kids and grandkids. I hope these inspire you!
Katie  

Wednesday, October 23, 2013

Prize Winning Chocolate Chip Toffee Grahams


I want to share with you the most awesome, wonderful, crowd pleasing treat ever. I have shared this recipe before but only 38 people ever saw the post. That should not be... Every time I take these cookies to a party, people rave about them. I almost never bring any home and they really are prize winning.
I'll tell you the story at the end of this post.
28 years ago I received this cookbook from my darling, Aunt Susan.
The outfits and crafts in this book are hysterical. 
When I perused the book, I found the recipe. I must have had the Lord shining on me the day I made them, because they came out perfectly. I don't mind sharing recipes and I've given this one out many times.  My friends have told me that theirs didn't turn out the same as mine. 

I will walk you through the recipe step by step to help guarantee success.
  • 11 whole graham crackers broken into rectangles
  • 1 cup butter (do not use margarine)
  • 1 cup sugar
  • 1 teaspoon ground cinnamon
  • 1/2 cup chopped pecans
  • 6 oz  chocolate chips (the recipe calls for mini chips but I never use those)
Have everything arranged and ready to go.
Arrange graham crackers onto a lightly greased jelly roll pan. 15 x 10. I arrange them all onto one side because 1 package won't really fill up the pan. You can use a cookie sheet, but the sides have to go up about an inch.
Heat oven to 350 degrees. 
Put butter and sugar in a sauce pan. Turn on burner to medium heat. Do not turn on the burner until both the butter and sugar are in the pan. Melt butter and sugar, stirring constantly. Keep stirring only to stop every once in a while to check to see if the mixture is boiling. You have to stop stirring because the thick mixture bubbles when you are stirring it. When you stop stirring you can see if it is really boiling or just glopping when you stir. (I think this might be where the recipients of this recipe are making their mistake.) Once the toffee boils turn on the timer for 2 minutes and keep stirring. Remove from heat after two minutes and add the cinnamon and pecans. Pour mixture over the graham crackers. Here is what they look like before they go in the oven. 
(note: if the mixture seems to thick to spread over the graham crackers, you may add 1/4 cup more butter to the toffee. Return sauce pan to the stove until butter melts.) 


Bake the crackers for 10 minutes, no more. I never ever, vary the baking time. 
Here is what they look like after they have baked.


Pull the pan out of the oven and sprinkle with chocolate chips. Some of the chips will fall in between crackers. If you want to have perfect looking bars with no dripping, oozing chocolate, you can put the chips on after you remove them from the pan. Make sure the cookies are still hot when you put the chips on. Work quickly to remove the toffee from the pan. If you wait too long the bars will stick and break. 
Place on cookie sheets lined with wax paper. You can cool in the freezer or the fridge. It is best to work with a partner. One can remove the toffee, while the other adds the chips onto the cookie. 


Here are a couple of tricks. 
You can increase the recipe by adding more graham crackers. Just increase the butter and sugar by equal amounts. I have done 1 1/2 cups of both before but I've never doubled it. 
These freeze really well. In fact I made some two weeks ago and put them in the freezer.


I pull them out as needed. ;) I love them crunched up over ice cream. I also like them without the chocolate chips.


I don't think you will be able to eat just one.


I promised that these were prize winning. 
My daughter's Junior High 4H club went to the Junior Live Stock Show in Fort Worth, Texas. In addition to animals the students could bring baked goods. She brought these cookies and won. She was allowed to get in the center of the arena and auction off her cookies. She was Reserve Grand Champion and received a gigantic belt buckle. It was too much fun.


Make some this weekend. If they don't come out the first time, try making them again. I promise they are worth it.


Katie
Linking with,