Monday, April 30, 2012

Did You Get The Memo?

I have been crazy about memo boards lately. 
I don't really need them. I pin a lot of my "memos" on pinterest so I don't need to post inspiration around the house. I would love to have a girly office, but I blog from the couch.
Still I love them and have been seeing a few different things as memo boards that really aren't . Repurposing them is just too fun.

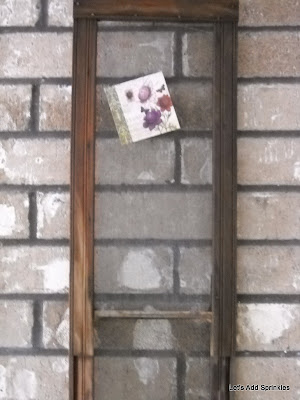
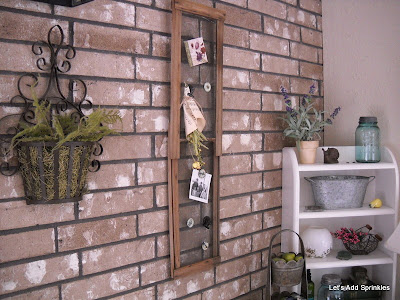
It started with this old screen I picked up at the builder supply. 

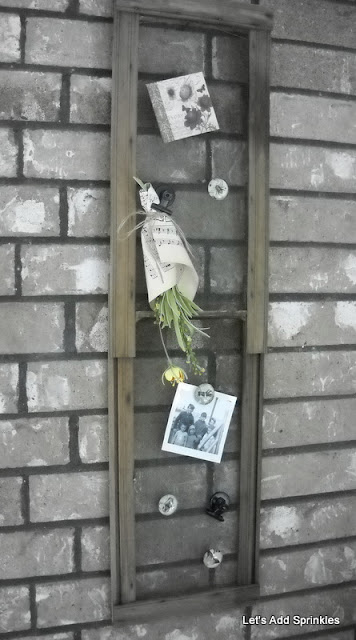
I decorated it with little pieces and bits. I was so pleased with it, I bought another one on our last little weekend at the lake.


There are about 4 little towns for antiquing around the lake house and we rotate towns each time. I find something just about each time. The prices are so much cheaper than in the city. 


The tole tray was $12.00 if you can believe that. The ironstone pitcher was $14.00. I have something fun planned this summer for the little fruit baskets.


I had been eyeing this screen for months and finally broke down and got it.  It is adjustable to fit any window that doesn't have screens. 
Although I feel very sorry for those that relied on a screen to cool them in the Texas heat. 

I have the perfect little spot in my sunroom. Read about my sunroom redo here.


Did you know that vintage screening was magnetic?
I had no idea. But it is and I was thrilled with the possibilities.
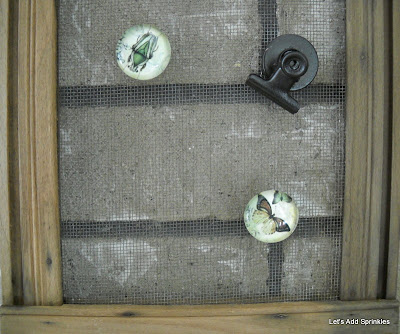
I gathered some cute magnets.


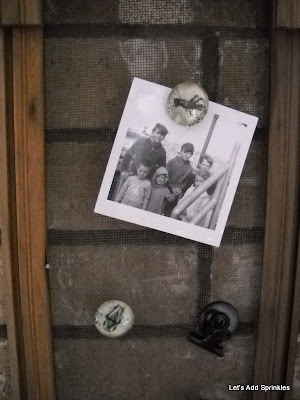
 My brothers and I at Mackinac Island.


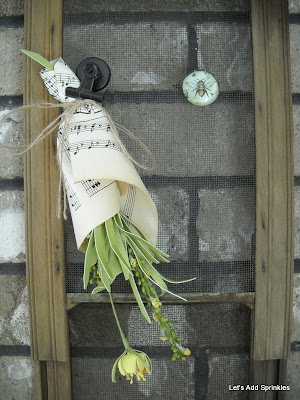
The vintage sheet music came from a recent trip to the thrift. I had been lamenting the fact that I gave a huge stack away a number of years ago. I was tickled to find a stack that belonged to an organist in town.


Bill thinks I've totally lost it with the ORB spray paint. I sprayed all my refrigerator magnets. 


 I've been going a little buggy around here.  
What do ya think?
Cute?
Katie
Linking with,
Newbie Party @ Debbie Doos 
Metamorphosis Monday @ Between Naps on the Porch 
Wow Us Wednesday @ Savvy Southern Style 
DIY by Design: Swing into Spring Party
You have got to stop by these blogs. 
They have helped me so much. I want to help them! 


Wednesday, April 25, 2012

From The Ostriches

Bill and I got away for a weekend at the my brother's ranch. 
It is one of my favorite places.

We did some hiking and digging in the trash pile. I found this.

Their property used to be an old ostrich farm in the 90s when all the ostrich farmers were going to be millionaires. I guess the meat was going to replace pork or beef or something. 
I thought it had an industrial farm chic vibe so we threw it in the truck.
I thought it might look cute hanging on the split rail fence Bill built a few years ago. There is a pretty sharp drop off between our house and the neighbor's. Nothing will grow in this spot because the water just drains down the retaining wall. We built the fence to add interest.


I cleaned up the feeder.


I planted it with a geranium, petunias and sweet asylum for spring.


I love how the alyssum spills over the side. 


I think I love it. 
I love that the hooks fit perfectly over the split rail fence. 
We'll see what happens as the temperature begins to rise, but for spring it is different. My neighbor even commented on it and he never comments on anything. I guess that could be good or bad... 

Katie 
Linking with: Time Travel Thursday @ The Brambleberry Cottage 
From My Front Porch to Yours-Treasure Thursday 
I Gotta Create @ Beyond the Picket Fence


Sunday, April 22, 2012

Boyfriend Watch Thrifty Find.

I love "boyfriend" watches. I like them with bling but I also love a woman wearing her man's watch.  ('cause isn't that how it all started?)  My sister, savy trend setter that she is, was doing this in the 70's. 


I would love to steal the one I got for Mr. Bill for our wedding a long time ago. But, I just got that one fixed up for him with a new crystal and new band so he is wearing it again. It ran about $100 to get it all fixed up.  Instead, I'll take the one he wore in H.S. It's very vintage looking. It also needs a new band but I won't replace the crystal. Well, maybe I will after looking at this photo.


I hadn't been wearing a watch for a long time. I teach preschool and dainty watches take a beating at my job. I carry my cell phone around with me all the time so I really haven't needed a watch in a long time. But, last summer I decided to try out the look to see if I could pull it off. My favorite thrift store is the perfect place to shop for a trend on the cheap. 
I found this watch for $3.00.

I don't know how old it is but it is a Calvin Klein watch. 
It is two tone which I love! It is hard to see the but the numbers are gold. I don't know why this thing was priced as low as it was because usually their watches start at $10.00.  I was willing to invest three bucks  in a watch I wasn't sure would work. 
With your handy dandy Swiss Army knife (hopefully in a glammy pink color like mine) pry off the silver back. It is a good idea to set your watch on something that won't scratch the crystal.
You can also use a very small flat head screw driver.

There is a little edge almost like a little lip. I actually read that it is called a wrench slot. That is where you pop off the back so you can see what  type of watch battery you need. Walmart has a good selection and that is where I got the one I needed. 
Some of them all look the same but they have different numbers on them. Sometimes, if you are lucky and the battery gods are shining on you, grocery stores will have the one you need. 
Walmart used to replace batteries for you, but they don't anymore. I guess an employee got stabbed taking off the back of the watch. That can be a danger so be careful! 
I was so excited at this point because I got to see if the watch actually worked. 
Yahoo! 
My $3.00 find began to tick. 
Watch a this YouTube video.

Now the band.


 Walmart also had watch bands. 
You will have to know in cm what is the width of your watch. The width of mine was 18cm.

I have perused ebay and they had a pretty good selection of watch bands. My husband prefers to get his bands at a jeweler. His are nice 
faux croc or something. 
 As long as mine was leather I didn't care where mine came from.  I was a little embarrassed to go into a jeweler with my thrifty find. 

To change the band, cut off the old one as close to the pins as you can.  The band is held on by tiny pins that operate just like a toilet paper holder. Once the band is off you can see what you are dealing with.  

Follow the directions on the new watch band.
It is very intricate as you can imagine. It can take some practice moving the tiny pin into place and then releasing it with the band in the way.
I loved this black band because it coordinates with most of my wardrobe.

Here is a breakdown of the cost.
 My watch was 3.00. 
The battery was 6.00 
The band was 7.00. 
I'm no math wizard but that adds up to a good deal. 
When I looked on ebay some Calvin Klein watches were going for $250.00.
I don't know why someone got rid of this watch when all it needed was a battery and a band. 
I have seen it over and over. I've gotten Seiko and Brighton watches this way.
Here it is in action. 

I am embarrassed by this but here are some other shots of my cute watch.
Will you think less of me if I confess that I corrected the age spots on my hand with picassa?
Ha ha. I didn't think you wanted to see those! 
Okay, enough cheese ball.
The bracelet is Tiffany. I bought it with a bonus a few years ago and I just love it. (To make sure you are getting authentic Tiffany buy from the website or the store. There is no such thing as a Tiffany Outlet!!!)
The counterfeiters are really good at replicating boxes, bags, tags and even receipts. 

Happy Hunting!

FyI: I think you need to go for an older men's watch, the new ones are ginormous!
Sprinkled with watch parts,

Wednesday, April 18, 2012

Five Best DIY Projects


Over the years I have embarked on some pretty hairy DIYs. I have 5 things that are by far the best projects or most worthwhile things I have ever done.

# 5. Removing the sliding glass doors on a bathtub. 
Our house in Lubbock, Texas was built in the 70's. At the time these doors had been in operation for 20 years. There was an incredible amount of soap scum and hard water stuck in the tracks. 
It would have been impossible to clean. It looked very similar to these. 

Photo by Gary Goubert
I just began unscrewing any screws and pulling off the pieces. I scraped away grout and caulk against the tub. I did not have a plan or instructions. I just began unscrewing things. 
I was able to hang a cute new shower curtain that was clean!! 
All that was left was two holes in the tile. These were visible to me, but anyone else would have to look for them. I almost wish I could do that with our surround in our master. See the project here. 

#4 Removing the built-in kitchen desk. 
We had a desk in the corner of the kitchen. It had a laminate top and three small drawers. It was cheesy and I wanted a piece of furniture in that spot. Again, I did not have a plan. (Do you sense a theme with me and not having a plan?) I looked at the area of the floor that would need flooring but for everything else I just winged it. 
I took a razor blade to the caulk surrounding the desk so I could pry off the laminate counter. It popped right off. I took out the drawers and unscrewed the frame from wall. The drawer unit easily pulled away from the wall and up from the floor. I was excited when it went out to the trash! 
I had extra flooring in the attic and patched the square where the drawer unit sat. I repainted the wall behind the desk. In just a few hours we had this cute spot to put this desk from my Nana.
Here it is when it was Robin's Egg Blue (Halycon Green- Sherwin Williams)


 Here it is now.


Can you even see where I patched the floor? No? I didn't think so.
It was a wonderful place to sit and talk on the house phone. 
Obsolete now with the advent of cell phones.
Do you notice the difference the lighter wall color makes?
Same spot, same time of day, much different feel to the room.

#3 Taking down the wallpaper in my house.

 We bought this house at the end of the wallpaper craze and before HGTV started telling us that we need wallpaper again. The bathrooms were easy. I guess because of the steam from the showers. The kitchen on the other hand was a nightmare. It came off in three inch pieces. I vowed then that I would never have wallpaper again. I love being able to change my walls every few years as the mood strikes. 
Although... 
Lately I have seen some cute wallpaper on the design shows. 
But I promised myself I would never wallpaper again!
The walls in my kitchen have been forest green wallpaper, yellow, Halycon Green and now this neutral called Kilim Beige, from Sherwin Williams.

#2 Texturing the walls in our kitchen.

I used a mixture of joint compound, white paint and sand. I dabbed it on with plastic grocery sacks. It was really easy, a bit messy but totally worth it. 


Here is a close up of the texture. I went with something not too heavy. It has been very easy to live with. I haven't ever felt the urge to redo. 

I know I have done something right if I don't have the constant urge to do it over.

#1 I think the best DIY for us is our tile floor.
 We had a pipe burst under my son's sink about 5 years ago. We pulled up the carpet and replaced it with tile. It handles pets well. We bought 600 square feet of tile. I don't know how much we actually laid but I assume it was over 500 square feet. It was a ton of work and there were tears involved, but it was worth it. 

There were tears when this guy ate my hamburger in the midst of a very difficult section by the piano. 
R.I.P Mikey Jan 1993-Sept 18, 2010


Living room wall color: Softer Tan- Sherwin Williams


The entry color is Antique White- Walmart Color Place. (It used to be made by Sherwin Williams.) (At least that is what I was told.)

There you have it. Five of our best projects. This was fun. I will have to do it again.


Okay, I think I owe you a few worsts. 
A.Pulling up the vinyl flooring in our kitchen and painting the floor with concrete paint. 
This idea was in magazines in the 90's The problem was that our new flooring would not stick to the painted floor and all the paint had to be hand scraped and sanded off. Bill was not happy. 
B. Patching a wall with tile adhesive instead of joint compound. I told Bill I needed to patch the walls in the powder room bath. He handed me a bucket. I assumed the bucket he handed me was joint compound. 
It wasn't until I was all finished, that I noticed it was the wrong stuff.  Re-patching the walls and touching up the paint is on my list of to dos this summer.
It did give the walls kind of a crackled effect that is pretty cool. 
It was not easy to work with though. 
I will leave you with some antics from Bekah's cat.
I got a new gazing ball when the dog knocked my other one off the retaining wall.


Hobby Lobby 40 % off.
Kitty really loved the box and hung out in there for hours.


I hope you have a blessed day. 

Katie 
Linking with:
Feathered Nest Friday @ French Country Cottage 
&Time Travel Thursday @ The Brambleberry Cottage 
100 Under a 100 @ Beyond The Picket Fence 
&Inspiration Friday @ At The Picket Fence